
So your kid’s birthday is coming up and you’re searching around for cake ideas and recipes you can make at home. We have compiled three for you centered around chocolate! Best of all, they don’t need much baking skills. Everything can be bought from the store and assembled quickly. Watch your son or daughter’s face light up when they see what a cake you have created and watch your guest’s faces too when they marvel at your imaginative skills. So here they are ─ amazing cakes to wow everyone, thanks to recipes and pictures from goodtoknow.co.uk.
Highlighted


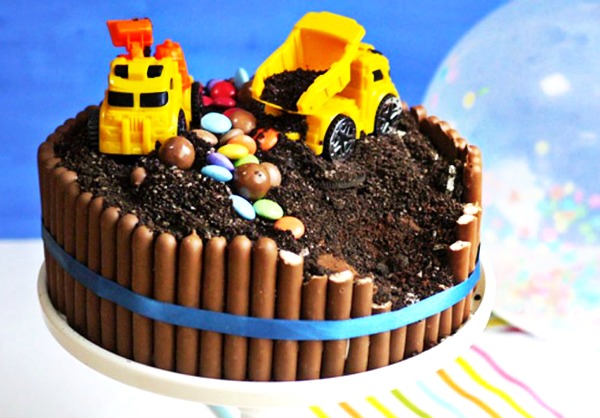
Digger Cake
- Serves: 6 – 8
- Skill: Easy
- Cost: Cheap
- Prep: 40 Min
- Cooking: 20 Min
[dropcap letter=”D”]igger cake is so easy to make, you’ll be amazed. Taming Twins blogger Sarah Barnes uses crushed Oreos to make convincing “rubble” and having chocolate fingers all around the edge helps to keep the “dirt” in place. Your little one is going to love this chocolate covered cake! Add your child’s favourite digger toys (preferably washed) and watch their face light up when you present this to them on their special day. Great for themed birthday parties. This cake serves 6-8 people and will take around 40 mins to decorate. You can buy or make your own sponge cake.
Ingredients
- 1 cake or use storebought chocolate cake
- 400g readymade chocolate buttercream
- 3 x 114g packs chocolate fingers
- 2 x 154g packs of Oreos
- 1 small bag Maltesers
- 1 tube Smarties
You Will Also Need
- Ribbon
- 2 small plastic toy diggers
Method
- Sandwich your two cake layers together using the buttercream icing and cover the sides and top of the cake in buttercream. If you are using a readymade cake, go straight to step 2.
- Use buttercream to stick chocolate fingers around the edge of your cake, packing them close to each other.
- Tie the ribbon around the cake – this will help to keep the chocolate fingers in place.
- At the front of the cake, trim down the chocolate fingers and sponge cake so it looks like some of the cake has been dug away.
- Bash up all the Oreos into ‘rubble’; it works well if you leave some large chunks while some become dusty.
- Pour the crushed Oreos into the ‘well’ created by the chocolate fingers around the cake.
- Position your diggers, and decorate with the Maltesers and Smarties.

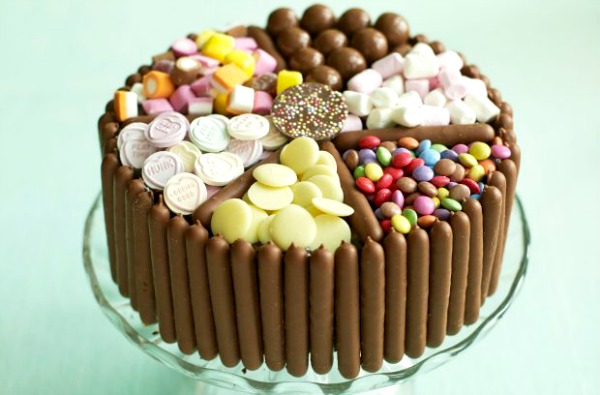
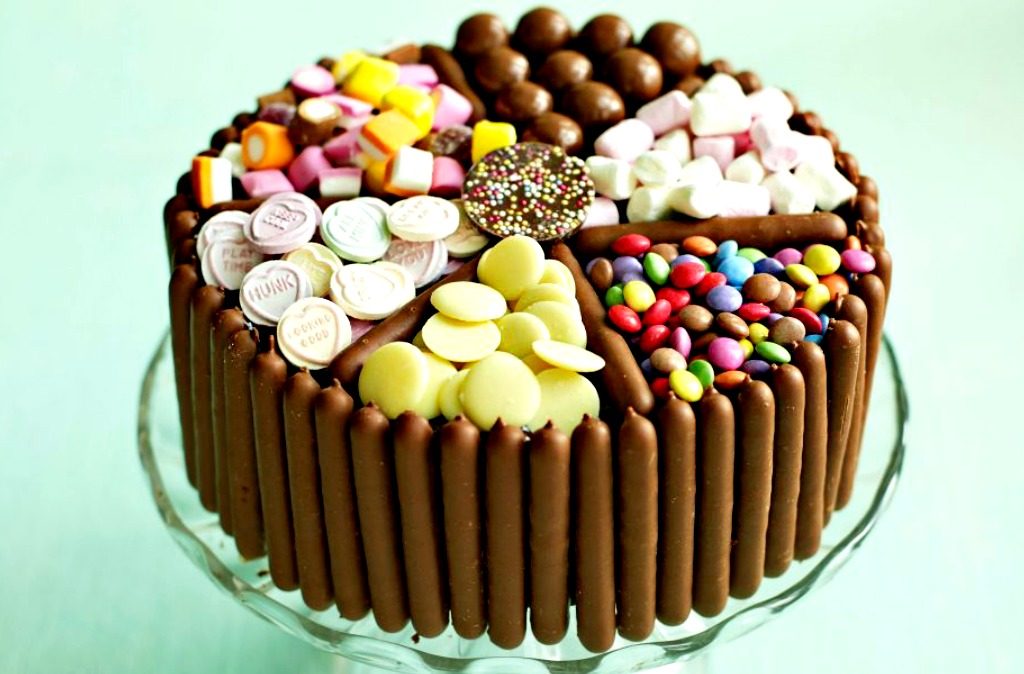
Pick & Mix Chocolate and Sweet Cake
- Serves: 8
- Skill: Easy
- Cost: Cheap
- Prep: 30 Min
- Cooking: 45 Min
[dropcap letter=”T”]his bright and cheerful chocolate cake sprinkled with Smarties, Maltesers and mini marshmallows, not only looks spectacular, but is also super easy to make. This Willy Wonka-style chocolate sweet cake recipe serves 8, and takes 1 hour and 10 minutes to prepare and bake. Wrapped in chocolate fingers and topped with sweets, it doesn’t get much naughtier than this!
Ingredients
- 125g butter at room temperature
- 175g golden caster sugar
- 175g dark muscovado
- 2 eggs, beaten
- 225g self-raising flour
- 60g cocoa
- ¼tsp bicarbonate of soda
- 300ml buttermilk
To Decorate
- 200g chocolate spread
- 28g packet and 138g packet milk chocolate fingers
- Selection of sweets – we used; white chocolate buttons, mini packets of Smarties, mini marshmallows, Maltesers, dolly mixtures and Love Hearts.
You Will Also Need
- 20cm round tin, greased and lined
Method
- Heat the oven to 180°C. Put the butter, golden caster sugar and muscovado into a bowl and cream together with an electric mixer, until pale and fluffy. Add the eggs, one at a time, whisking well between each addition.
- Sieve the flour, cocoa and bicarbonate of soda into the mixture, then pour in the buttermilk. Stir together to create a smooth mixture.
- Spoon the cake mixture into the prepared tin. Bake for 45 mins, until risen, firm and shrinking away from the sides of the tin. Push a cocktail stick into the centre of the cake; if it comes out clean, the cake is ready. Cook for a little longer, if needed. Cool in the tin.
- Turn the cake out on to a cake stand. Cover the sides and top of it with the chocolate spread, using a palette knife.
- Press the chocolate fingers around the cake sides. Arrange 6 chocolate fingers on top of the cake to divide it into sections. Pile the different sweets into each section.

No-Bake Train Cake
- Serves: 6 – 8
- Skill: Easy
- Cost: Cheap
- Prep:1 Hr
[dropcap letter=”Y”]es, this incredible kids’ birthday cake involves absolutely no baking! All you need to do is follow the instructions to create this impressive train cake from shop-bought cakes and biscuits that you can find at any supermarket. It’s the perfect birthday cake cheat.
Taming Twins blogger Sarah Barnes uses ready-made cake and biscuits, which is perfect if you’re looking for a quick and simple cake idea for your little one’s birthday. The train is made from chocolate Swiss roll and Mini Rolls. It will take around one hour to assemble. Store in an airtight container until you’re ready to serve it. You can fill the train’s carriages with your child’s favourite sweets and chocolates. Leftovers can be stored in a cake tin for up to two days or wrapped in tin foil and kept in the fridge. The kids are going to love it!
Ingredients
- a large cake board/drum (or a kitchen tray, covered in tin foil)
- 100g desiccated coconut
- few drops green liquid food colouring
- 400g readymade buttercream icing
- 130g pack Matchmaker chocolates
- 114g pack chocolate fingers
- 2 chocolate Swiss rolls
- 4 Jammie Dodger biscuits
- 2 liquorice whirls
- 4 Mini Rolls
- 1 tube Smarties
- 1 small bag Jelly beans
- 1 small bag Iced Gem biscuits
Method
- Put the coconut in a bowl and add green food colouring, starting with just a few drops. Stir it in, adding more colouring a few drops at a time, until it reaches the desired shade of green to make ‘grass’.
- Spread the cake board with a thin layer of the buttercream icing and sprinkle the coloured coconut evenly over this. Press down lightly with your hands to stick it on.
- Next, position matchmakers to form the train tracks. Use a little buttercream to stick them down. Top these with chocolate fingers to form the cross pieces of the track. Use a little buttercream to stick them down.
- Now trim a piece, about 10cm long, from the end of your first Swiss roll. Put the remaining longest piece onto the tracks as the train engine.
- Stick the 10cm leftover piece of Swiss roll on top of the engine using buttercream to secure it. (You can trim a little bit off of the underside in a curve shape to make it sit better if you like).
- Use buttercream to attach a liquorice whirl to the top of this piece and another to the front of the engine.
- Add the 4 Jammie Dodgers to the engine, using buttercream, to form wheels.
- Take the second Swiss roll and cut it in half, slice the top off of each of these sections of Swiss roll to form the cars.
- Sit 2 Mini Rolls on top of the tracks behind the engine, and top with one of the half Swiss roll sections. Spread the top with buttercream and top with Smarties.
- Behind this, sit the remaining two mini rolls, with the last piece of Swiss roll on top. Add buttercream and jelly bean ‘freight’.
- Add some Iced Gems to the ‘grass’ like flowers.
For more great recipe ideas, go to Motherhood.com.my