
Illumination is a key aspect of Raya celebrations in Malaysia. Family festivities and visitations can carry on well into the night. It’s always the norm to fill your house with as much light as possible. It is a long-standing tradition among Malays to decorate their roofs with fairy lights, burn sparklers and most importantly, surround the perimeter of their front yards with oil lamps. These traditional oil lamps (also known locally as ‘pelita‘) are mounted on bamboo poles and come in a variety of colours. They are often the staple decorative element in many Malaysian Muslim households, especially for Malam Tujuh Likur.
What is Malam Tujuh Likur?


Malam Tujuh Likur was probably originally attributed to Lailatul Qadr, which are the last 10 nights of Ramadan. There are some that say Malam Tujuh Likur is the final three nights of Ramadan. The line between the two is less clear in modern times. But the fact remains that these final nights are thought to be most potent for prayer as anything asked for would be granted. So many Muslims take this opportunity to increase their worship and devotion. One of these ways is to attend the evening Tarawih prayers. Now, you may be asking, “What does this have to do with the oil lamp tradition?”
Many scholars believe that the tradition of Malam Tujuh Likur was started by Muslims devotees to light the way of the pious through the darkness. Literally. The final nights before Eid would occur during a waning or new moon. Many areas without artificial light or street lamps would be shrouded in darkness. So, it was perhaps customary back then to line your driveways and property with oil lamps to help the devotees find their way safely to the mosque at night.
These days, Malam Tujuh Likur may be associated with some local superstitions, but otherwise it is a fun activity to have with the family. Especially if you need a convenient source of fire to light some fireworks or sparklers. If you want to save some money this Raya, or just have something to do with the kids, here’s how you can make your own oil lamps at home:
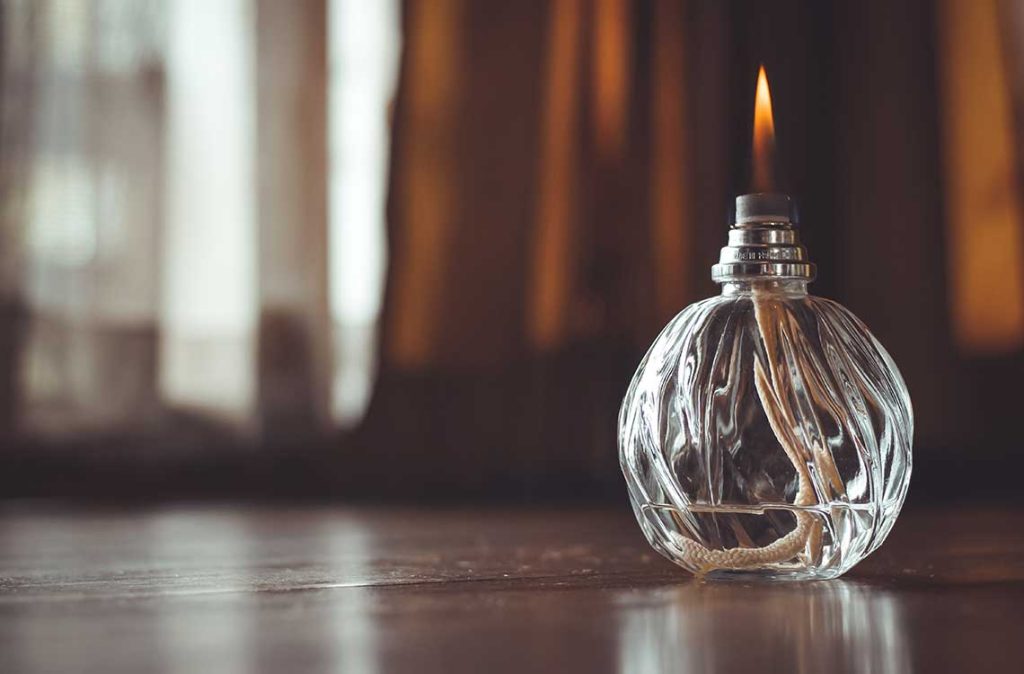
Step One: Assemble your Ingredients

You only really need four things to make a good oil lamp: a heat-resistant container with a metal lid, a drill (or hammer and nail), and a good thick rope. But there are a few caveats to keep in mind. What the materials are made of will either make or break your project. For instance, if you’re using a glass container (like a mason jar or a long-necked bottle) for your oil lamp, make sure the material is highly flame proof. They will usually indicate so on the item, so be sure to double check. As for the type of rope, make sure that it’s not synthetic or made of plastic. A good, thick cable-twisted rope will ensure a nice, healthy flame and also make your oil lamp go a lot further.
Step 2: Make a Hole and Insert the Rope

Most households may not come with a commercial drill, but many do have a hammer and nail. Now, all you need to do is make a medium-sized hole big enough for the rope to enter, but not big enough that it could slip back through. This should be no problem with a drill as you can adjust bit sizes. But it may be a bit tricky to make a hole on a metal lid, even with a drill. The trick is to make a hole with the lid already screwed onto the jar. The jar will hold the lid in place allowing you to drill or nail a hole in it. You can also lay the lid on a wad of plasticine, blue tack, a piece of wood you don’t care about, or just a nice bed of soil. Place the lid on your material of choice, aim the nail at the centre and hammer it in.
Be careful about how hard you hit because you may be making a much bigger hole than you intended. Once you think you’ve made a good-sized circle, thread the end of the rope in; the rope length should not matter but it shouldn’t be too long or too short. If it’s too short, you’ll have to keep replacing the wick. If it’s too long the jar may be too overcrowded and the wick won’t absorb enough oil. Make sure to only leave about an inch at the top or less.
Step 3: Saturate the Wick and Set Aflame

Here comes the time to put your oil lamp together! First, drop the rest of the wick rope into the jar (the end of the rope should still be attached to the lid). The way you put the rope in doesn’t really matter but many people suggest letting it twirl at the bottom in circles. This leaves a clean, professional look to it. Then, pour in the oil of your choice. The best oil is naturally kerosene, although you can also use cheap vegetable oil. If you want you can add an essential oil of your choice to perfume your house when you light the wick (if you’re burning the oil lamp indoors, of course). Lastly, screw on the lid. You will have to wait a few hours for the rope to be sufficiently saturated with the oil before you burn it. Otherwise, the wick won’t ignite when you light it. If all is set, you can go ahead and burn your oil lamp.
Illuminate Your Home with Oil Lamps this Hari Raya

Oil lamps are a staple decoration in many Malaysian Muslims’ homes during Eid. They’re pretty, easy to use and can also provide some added illumination to your house at night. While you may not be able to pitch your homemade oil lamps on poles, you may be able to hang them on trees and fences. As always, practice good fire safety and always have an extinguisher on hand. Fire can be pretty, but it is also pretty dangerous. Of course, you can also use the oil lamps indoors. Just make sure not to leave them unsupervised or in places where your little ones could get to the flame.
Your own DIY oil lamps can certainly be something to show off to your visitors. Your guests will certainly be impressed by your ingenuity and it may even inspire them to do the same with their families.
Motherhood Story wishes all our Muslim readers Selamat Hari Raya Aidilfitri in advance!
For more insightful stories and fun recipes, stay tuned to Motherhood Story!