
Now that you and your partner are planning to have a baby, what can you do to increase your chances of getting pregnant? It all goes down to having intercourse at the right time, which is in the two days before ovulation and the day you ovulate.

You must be wondering, how is it possible to identify when you are fertile and ovulation is likely to occur? There are of course physical signs and symptoms when a woman is ovulating, but they could be hard to tell because the symptoms are similar to PMS, menstruation, and even early pregnancy.
The timing of ovulation can also vary from cycle to cycle so you’re not going to ovulate on the same date of each month. That is why trying to get pregnant can be tricky for some couples. One way to predict your most fertile days of the month is by using an ovulation test.
![]()
As simple as that sounds, first-time users often find it confusing to use and interpret ovulation tests. If this sounds familiar, fret not as you can read on to find out which is the best ovulation test out there and the step-by-step guide of using the useful kit correctly!
How Do Ovulation Tests Work?
![]()
Ovulation tests detect hormonal changes in your body that signal your ovaries to release an egg for fertilisation. If the test detects the surge of luteinizing hormone or LH in your urine then there’s a high chance that you’ll ovulate within the next 24-36 hours.
This detection can aid in the planning of intercourse and enhance the likelihood of becoming pregnant. Based on the result, you and your partner can decide whether the timing is right for lovemaking and trying to have a baby.
Although ovulation tests are simple to use and function in much the same way as pregnancy tests, they serve very different purposes. A pregnancy test detects the human chorionic gonadotropin (hCG) that you are expecting, whereas an ovulation test looks for hormones that indicate your body is ready to conceive.
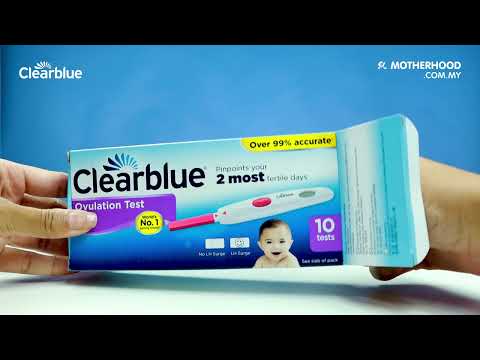
Detect Your Most Fertile Time with Clearblue
![]()

The Clearblue Digital Ovulation Test is so convenient and easy to interpret. In just 3 minutes of testing your urine, you’ll find out whether you are ready to make babies or not. It also has several unique features and benefits that help identify peak fertility, including:
- Sophisticated technology that detects the LH surge in urine with greater than 99% accuracy.
- Uses innovation based on proven technology to make a reliable product.
- A digital display that shows a smiley face for positive or a blank circle for negative to give you unmistakably clear results.
- A unique adaptive algorithm that adapts to a woman’s hormone levels.
In fact, the Clearblue Digital Ovulation Test is the only brand that can adapt to a woman’s hormone levels each time she takes a test. As each woman’s menstrual cycle is different, the algorithm aids in determining the best time to conceive.
How to Use the Clearblue Digital Ovulation Test
Before you start checking for your fertile window, you need to know your usual cycle length, so you can estimate when you should be taking the ovulation test. There’s no specific timing of when you should do your test, but it is better to test it around the same time each day.
It is best to take the test with morning urine or at least 2 hours before your last fluid intake as drinking too much water before the test dilutes your LH concentration, making it more difficult to detect ovulation.
You should also read the instructions on the package and in the leaflet to ensure that all items are there in the kit and you know which is which. Once you are ready, the following is a step-by-step guide on how to use the Clearblue Digital Ovulation Test.
6 Steps to Using the Clearblue Digital Ovulation Test
- Remove the Test Stick from the foil wrapper to be inserted into the Test Holder (do this only when you are ready to test because the stick has to be used right away).
- Before assembling the ovulation test, remove the cap and find the pink arrow on the Test Stick. There is also a pink arrow on the Test Holder.
- Assemble the ovulation test by lining up both pink arrows on the Test Stick and the Test Holder. Then, insert the Test Stick into the Test Holder until it clicks into place and the test ready symbol appears.
- Once the ovulation test is ready, you can test your urine in two ways: i) either directly in your urine stream (pointing downward for 5-7 seconds), or ii) test a sample of your urine collected in a clean, dry container (dip for 15 seconds).
- Now, the waiting time begins. At this point remember to always keep the Absorbent Tip pointing downwards or lay the test flat. The test is working when the test-ready symbol starts flashing after 20-40 seconds.
- Your result will appear within 3 minutes. If no LH surge is detected, you can test again the next day at the same time using a new Test Stick. If your result detected LH surge, make love during the next 48 hours to maximise your chances of becoming pregnant.
Get Your Clearblue Digital Ovulation Test Today
![]()

Trying to get pregnant means you’ll always have to be ready for the right time. So, make sure to always have the Clearblue Digital Ovulation Test standby in your medicine storage. Purchase yours today from Clearblue’s marketplace on Motherhood.com.my.
You may also schedule an appointment with KL Fertility for a chance to experience the precision of Clearblue.
Never miss ovulation again with the Clearblue Digital Ovulation Test—Don’t hesitate further and get one today!
For more insightful stories and fun recipes, stay tuned to Motherhood Story!